Spring Boot and React
Part 2: Adding Data

This blog is part 2 of a series I'm doing on Spring and React. It is not meant to be a lesson in either Spring or React, but rather demonstrates a means to marry them together.
- Part 1: Setting up a build with Gradle and Webpack
- Part 2: Pulling Data into React from Spring Boot APIs
Up to this point we have seen how to build a React application and bundle it as a static resource for Spring Boot to serve. The entire build process was orchestrated by Gradle which delegates the bundling of the React App to Webpack.
In this part we will see how to expose data from Spring Boot and, consume and display this data in the React application.
The accompanying source code is available here:
Pulling Data from an API
For this example, let's say that we want to show a list of our friends on the web page and that this list
needs to come from the Spring Boot server's database somewhere. First we create our Friend
class, with just a name attribute.
package com.andrew_flower.demo.springandreact.model;

import ...

@RequiredArgsConstructor
@Getter
public class Friend {
    private final String name;
}
I've used Lombok annotations to generate a constructor, which we need so we can give our Friend a name, and to generate a Getter, which Spring Boot (or Jackson) will need when converting our object to JSON. See the Appendix regarding using Lombok.
Exposing an API
Now that we have a model, we should store it in a Repository. But before we get to
repositories,
let's first expose some dummy data via an API. So that we can build a vertical Prototype with React using
the
server data, and then come back to fleshing the server side out.
Note that it's possible to use Spring Rest to automatically expose Repositories with Rest
APIs, but
for a few reasons we will expose an API manually. One reason being that I don't like the JSON format, and
another
that I prefer to clearly and explicitly choose what is exposed using Controllers.
Below is our Controller exposing an API that provides dummy data for our best friend.
package com.andrew_flower.demo.springandreact.controller;

import com.andrew_flower.demo.springandreact.model.Friend;
import org.springframework.web.bind.annotation.*;
import java.util.*;

@RestController
@RequestMapping("/api/friends")
public class FriendController {
    @GetMapping
    public List<Friend> list() {
        return Arrays.asList(new Friend("Andrew"));
    }
}
Here we have exposed an API on the endpoint /api/friends/. The @RestController
annotation
tells spring to treat all methods as having a @ResponseBody annotation, meaning that their
return
values will be converted to a web response, using appropriate
MessageConverters, which due to Spring Boot's Auto-Configuration will result in JSON output.
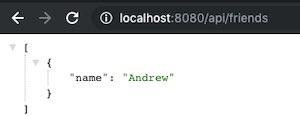
Running our App (with ./gradlew bootRun) we can see the API is now available using the
browser.

Displaying API Data in React
Our next goal is to display this data that is available via the API. The code in this section is quite similar to these Official React docs with regard to making the AJAX request.
Basing Component State on Data
Let's create a new component to render the list of friends we will get.
import React, { Component } from "react";

class FriendList extends Component {
    render() {
        if (!this.props.friends) {
            return <div>No Friends yet...</div>
        }
        return (
            <ul id="friend-list">
                {this.props.friends.map(friend => (
                    <li>
                        {friend.name}
                    </li>
                ))}
            </ul>
        );
    }
}

export default FriendList;
Our new component FriendList renders a bullet list with the names of all
friends.
The component expects to receive a list of friends from the parent component which
is shown below.
Feeding Data from the API
Now we can feed the data into React from the API into our new FriendList component. Let's
modify our Main component from Part 1.
import React, { Component } from "react";
import ReactDOM from 'react-dom';
import FriendList from './FriendList';
import '../css/Main.css';

class Main extends Component {
    constructor(props) {
        super(props)
        this.state = {
            friends: []
        }
    }

    componentDidMount() {
        fetch("/api/friends")
            .then(res => res.json())
            .then(
                (response) => {
                    this.setState({
                        friends: response
                    });
                },
                (error) => {
                    alert(error);
                }
            )
    }

    render() {
        return (
            <div id="main">
                <h1>My Best Friends</h1>
                <FriendList friends={this.state.friends}/>
            </div>
        );
    }
}

ReactDOM.render(
    <Main />,
    document.getElementById('react-mountpoint')
);
After mounting, our Main component uses the
fetch API to make a call to our Spring Boot API ("/api/friends") to fetch the list of
friends.
It then parses the JSON and, knowing it to be an array, stores it in the component state.
The component's render method, passes the friends array from state to the
FriendList
component (that we just created in the previous section) as a property.

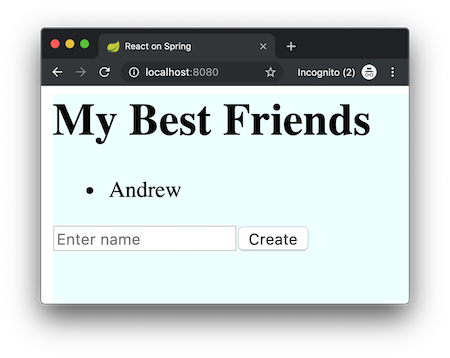
Running the app, we now see our best friend, Andrew, in our list. So we've demonstrated interaction between the frontend React application and the backend Spring Boot application, albeit with a hardcoded return value. Note that I've added React Logo as a background image in CSS. You can see the code in the GitHub repo if you want to.
Adding a Proper Data Backend
Up until now we've been just been returning hard-coded data straight from the controller methods.
For a more realistic and usable scenario, we need to add some data backend that will store our data. For this example we will use an embedded in-memory SQL database called H2.
Adding the data store
Data will be stored in an embedded H2 database that Spring Boot will start-up and manage for us. We will
then use Spring Data JPA's CrudRepository to access the data easily. Before we do that we
need
to add the Gradle dependencies:
...
dependencies {
    implementation 'org.springframework.boot:spring-boot-starter-web'
    implementation 'org.springframework.boot:spring-boot-starter-data-jpa'

    compileOnly 'org.projectlombok:lombok'

    runtimeOnly 'com.h2database:h2'

    annotationProcessor 'org.projectlombok:lombok'
}
...
Just by adding this h2 dependency along with the spring-data-jpa starter, Spring
Boot
knows to automatically auto-configure an h2 database.
Let's modify our model so that it can be used as a JPA entity. We add the @Entity annotation
to declare it
as an object that can be persisted with JPA, and we give it a primary key using the @Id
annotation,
and declare that the ID should be auto-generated. Not we also have to add a no-args constructor which
JPA needs, and the builder needs an all-args constructor.
...

@Builder
@Data
@Entity
@NoArgsConstructor
@AllArgsConstructor
public class Friend {
    @Id
    @GeneratedValue
    private Long id;
    private String name;
}
Now we declare a repository that will store our model (JPA Entity). To do this, we just derive an
interface
from CrudRepository and specify both our domain model type (Friend) and the ID
type (Long).
package com.andrew_flower.demo.springandreact.repository;

import com.andrew_flower.demo.springandreact.model.Friend;
import org.springframework.data.repository.CrudRepository;

public interface FriendRepository extends CrudRepository<Friend, Long> {
}
Serving data from the Repository
Finally we inject the repository into our controller and replace the hard-coded Friend with the
Iterable
response from the repositry. Spring Data's CrudRepository provides the interface and does all
the
work to load and unmarshall data from the H2 database.
...
public class FriendController {

    @Autowired
    private FriendRepository friendRepository;

    @GetMapping
    Iterable<Friend> list() {
        return friendRepository.findAll();
    }
}
If you go to
http://localhost:8080/api/friends in your
browser now, you will receive an empty JSON list.
We can pre-populate the database with some data using a Runner, which is one nice way to run
commands after Spring Boot has loaded up. Another way is to create a data.sql file in the
resources directory, which Spring Boot will use to populate the DB. You can read more about this
in the Spring Boot docs.
...

@Component
public class FriendFaker implements ApplicationRunner {
    @Autowired
    private FriendRepository friendRepository;

    @Override
    public void run(ApplicationArguments args) {
        friendRepository.save(
                Friend.builder().name("Andrew").build()
        );
    }
}
Running the application and navigating to http://localhost:8080/ we can now see the same
output, but we know that this data is now coming from the H2 in-memory database now
Pushing Back
We have done a lot of work and we don't even have any interactions with the application. Let's end by adding the ability to create new friends.
Exposing a POST API
Firstly we need to allow creation of data via POST operations on the Spring Boot side, so we add a new
controller method. This endpoint responds on the same path but to POST action.
It creates the friend using a request parameter called name, and persists it using the
repository
On success, this endpoint returns the new
Friend object with status code 201 (Created).
    ...
    @PostMapping
    @ResponseStatus(HttpStatus.CREATED)
    Friend create(@RequestParam final String name) {
        return friendRepository.save(Friend.builder().name(name).build());
    }
Creating Data with React
Next we want to create a simple form that allows us to specify the name of a new friend to create, so we
modify the render method of our Main component to add the form below the
FriendList.
    ...
    render() {
        return (
            <div id="main">
                <h1>My Best Friends</h1>
                <FriendList friends={this.state.friends}/>
                <form onSubmit={this.handleSubmit.bind(this)}>
                    <input id="name" name="name" type="text" placeholder="Enter name"/>
                    <button type='submit'>Create</button>
                </form>
            </div>
        );
    }
}
Now our component has a form with a text field for name and a but a button to submit the form. When the
form is submitted it will call a function in our component to handle the event. Note that we have to bind
this to the function explicitly or else the function won't have access to the component
instance.
Finally we create the function that handles the submit and sends the POST request to the Spring Boot
server.
We use the convenient
fetch function to make an AJAX call to our new POST endpoint, passing in data from the
form that generated the submit event.
    ...
    componentDidMount() {
        this.fetchFriends();
    }

    fetchFriends() {
        fetch("/api/friends")
            .then(res => res.json())
            .then(
                (response) => {
                    this.setState({
                        friends: response
                    });
                },
                (error) => {
                    alert(error);
                }
            )
    }

    handleSubmit(evt) {
        evt.preventDefault();
        fetch("/api/friends", {
            method: "POST",
            body: new FormData(evt.target)
        }).then((response) => {
                if (response.ok) {
                    this.fetchFriends();
                } else {
                    alert("Failed to create friend");
                }
            }
        ).catch((error) => {
            // Network errors
            alert(error);
        });
        evt.target.reset();
        return false;
    }
    ...
We also moved the code to request the latest friend list from componentDidMount() into its
own function fetchFriends() and call it immediately after successfully creating a new friend.
One thing that we should do is improve our FriendList to use keys on each list item. Now that
we
have an id for each Friend from the API, we can use that as the key. Keys are very important to help React
render lists efficiently. Read more about it
in the React docs about
keys.
...
<ul id="friend-list">
    {this.props.friends.map(friend => (
        <li key={friend.id}>
            {friend.name}
        </li>
    ))}
</ul>
...
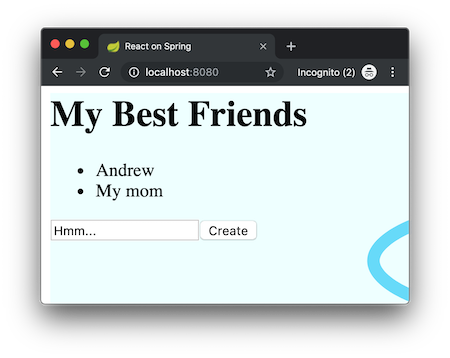
We now have a working example of an interactive full-stack application using a React frontend served by Spring Boot. Running it, we can see the pre-populated friend list with a small form that lets us add more friends.

Summary
Hopefully this was a helpful blog post for you. We covered a few concepts in both Spring Boot and React, but
the
main focus was how to get them communicating with one another. The key to this was the a Controller that
exposes
APIs from Spring Boot and a AJAX call (fetch command) that retrieves the data in the React app.
Overall the concepts we covered included:
-
To create an API Controller in Spring Boot/Web, we use the
@RestControllerannotation instead of just@Controller. -
We can use
CrudRepositoryto easily get a JPA interface to a SQL data store like H2 or MySQL, where the stored domain model is marked with a@Entityannotation. -
Any API can be easily invoked from React using Javascript's
fetchfunction. -
Form input can be easily sent via
fetchor a normalXMLHttpRequestSectionby using aFormDataobject.
The accompanying source code is available here:
This blog is part of a series about creating Spring Boot and React applications, so take a look at other posts that might seems interesting.
- Part 1: Setting up a build with Gradle and Webpack
- Part 2: Pulling Data into React from Spring Boot APIs
References
Appendix
Using Lombok
Lombok is an extremely useful library that allows us to keep our code clean, by providing annotations that we use to signal standard code patterns to be generated, such as getters, setters, constructors, toString methods, equals, hashCode and even builders.
Lombok is only needed at compile-time to process the annotations, and can be included in the build by
adding
just two dependencies. The compileOnly dependency let's us use the annotations, and the
annotationProcessor dependency instructs Gradle to let Lombok do compile-time annotation
processing.
// ...

dependencies {
    implementation 'org.springframework.boot:spring-boot-starter-web'

    compileOnly 'org.projectlombok:lombok'

    annotationProcessor 'org.projectlombok:lombok'
}

// ...
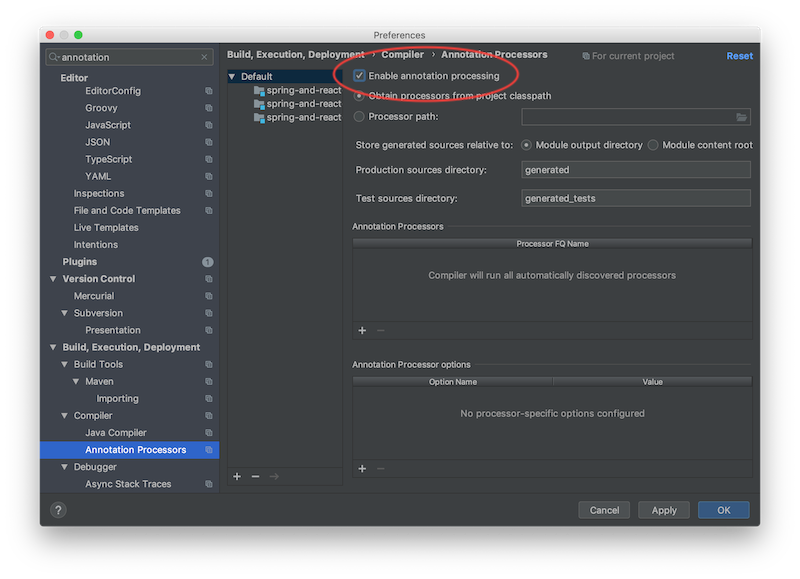
If you are using IntelliJ, you will need to enable Annotation Processing for the project in Preferences.

Bitcoin

Zap me some sats


This blog post itself is licensed under a Creative Commons Attribution 4.0 International License. However, the code itself may be adapted and used freely.